The search bar is located on the bottom left of the task bar.
![]()
- Click the magnifying glass to open the search tab.
- Once open, start typing what you are looking for. Click on the file or program needed.

The search bar is located on the bottom left of the task bar. Click the magnifying glass to open the search tab. Once open, start typing what you are looking for. Click on the file or program needed.
The search bar is located on the bottom left of the task bar.
![]()
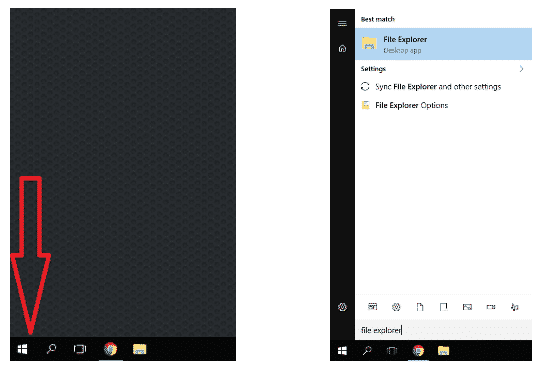
Within Windows 10, the File Explorer location has been changed and is a bit less intuitive to locate then previous Windows versions. To open File Explorer you can use one of the following methods: Click the “File Explorer” Icon on the taskbar 2. Open the Windows menu by either pressing […]
Within Windows 10, the File Explorer location has been changed and is a bit less intuitive to locate then previous Windows versions.
To open File Explorer you can use one of the following methods:
![]()
2. Open the Windows menu by either pressing the Windows key, or selecting the Windows icon in the lower left as shown below. Then type “file explorer” and select the first option.
NOTE: There is not a search bar in this menu, but if you type after you open it, it will bring one up.
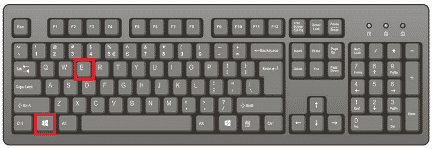
3. Press the Windows key + E key on your keyboard at the same time.
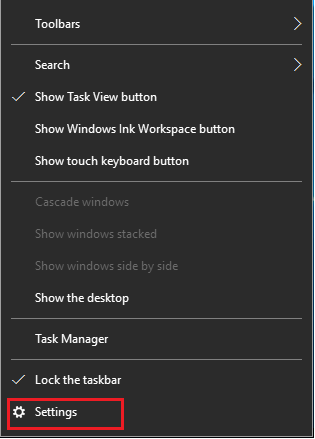
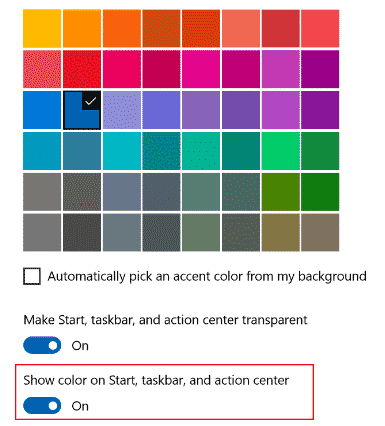
Change the Color Right click on the taskbar itself. A menu should appear, at the bottom of that menu there is a “settings” option, click that to begin. The window that pops up has a menu to the left of it, click “color”. Choose the color you would like your […]


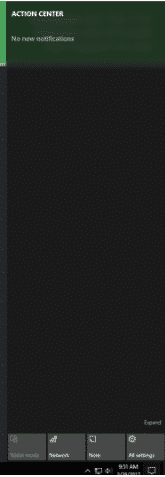
Opening the Notifications Menu The button to open the notifications menu is on the bottom right of the screen. Click this to open the Action Center, or Notifications Menu. This will open a window to the right of your screen that will have a few options at the bottom. All […]

Logging Off Open Start Menu with Windows button on keyboard or clicking lower left Windows icon Click on the VTC logo near the left side, this is the User icon Here you can also lock the computer and switch to a different user Alternately, there is a custom “Log Off” […]
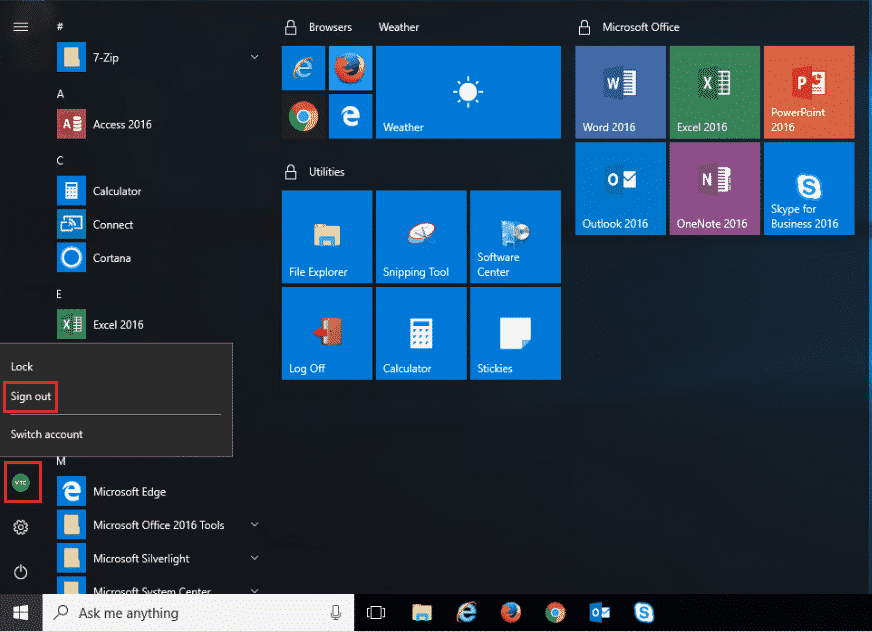
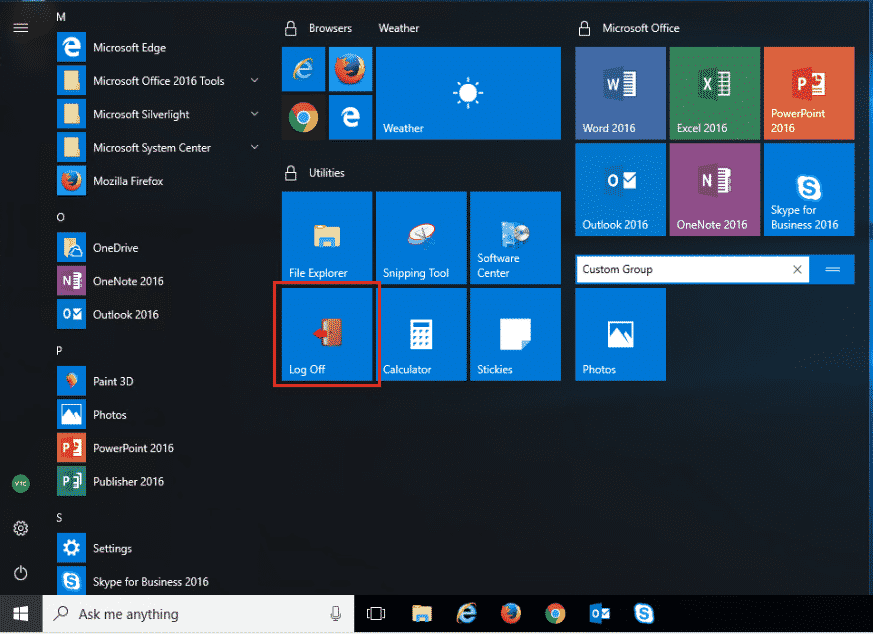
Alternately, there is a custom “Log Off” tile, located on your Start Menu
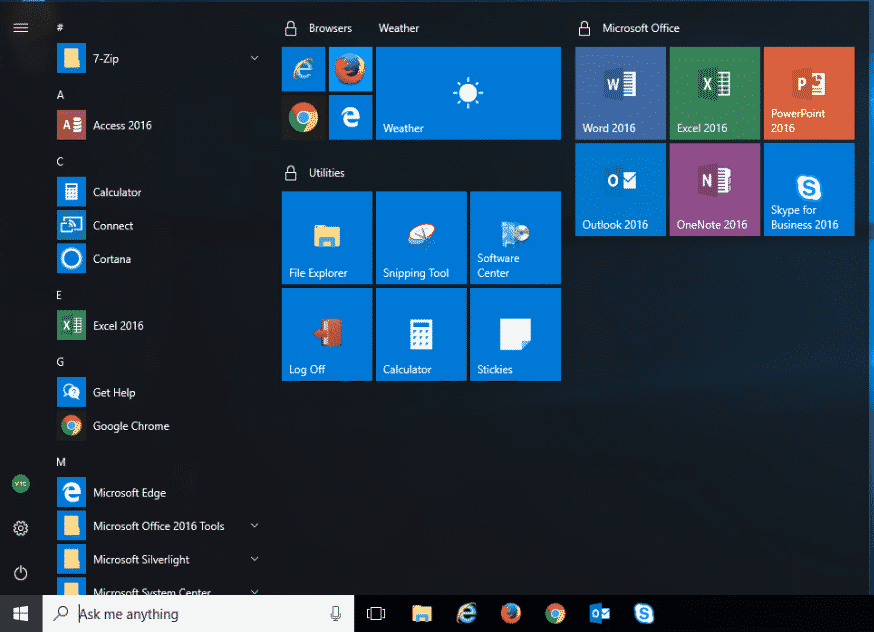
In the Windows menu, to the left are squares that are called Tiles. They are shortcuts to applications that you use often and other useful ones. To open the application, click on it.
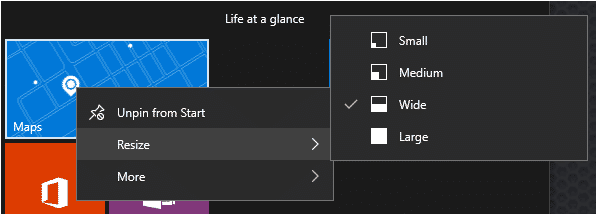
To resize tiles, right click and hover over resize, then select the size you would like.
NOTE: Not all tiles can be resized, and not all tiles can be resized to large.
Tiles are grouped into different categories, some of which can be moved around. Groups with locks by the names can not be moved and the applications within them can not be removed or added to.
To search for an application or file you can’t find in the Start Menu, click the Windows icon in the lower left of the screen, or press the Windows key on your keyboard, and start typing the name of the application or file.
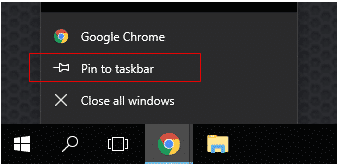
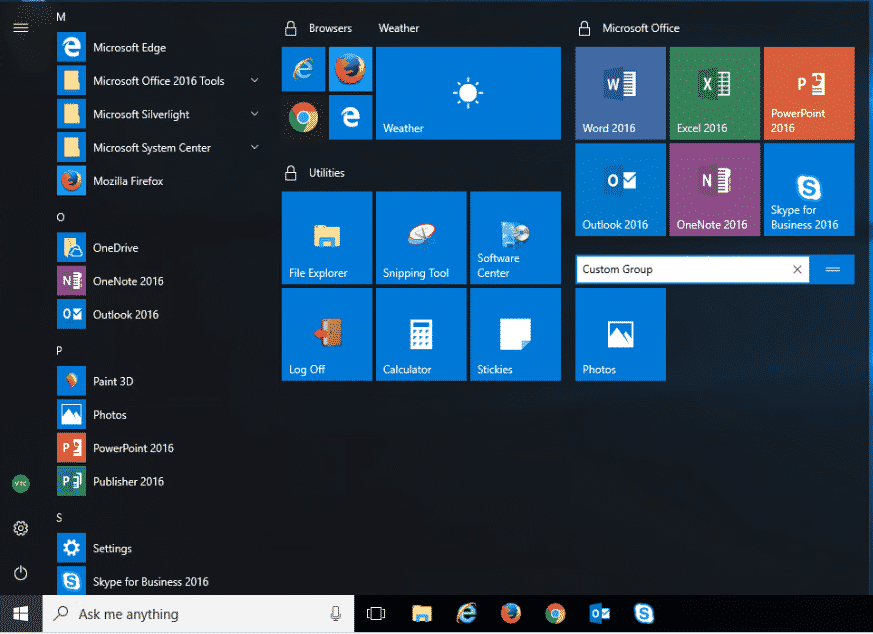
Adding an application to the tiles menu.
Microsoft Word is a word processing program which allows you to create documents with various formatting and customization options. Add videos, graphs, pictures, watermarks, styling, and more. Word Documents can be saved in multiple formats including PDFs. Tell Me At the top of the navigation menu over to the right, […]
Microsoft Word is a word processing program which allows you to create documents with various formatting and customization options. Add videos, graphs, pictures, watermarks, styling, and more. Word Documents can be saved in multiple formats including PDFs.
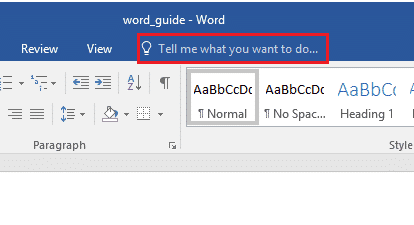
At the top of the navigation menu over to the right, you will notice a little lightbulb icon with a search box next to it. This is Microsoft Word’s Tell Me feature, which allows you to search for features in Microsoft Word by typing in certain key words or phrases. For example, if you wanted to know how to insert a picture into your document, you could search “picture” and Tell Me will come up with a small list of features, including the insert picture action.
![]()
When you download a document from your email or online you might notice you can’t make any changes to it. This is because by default Word only allows you to view the document for your safety. If you trust where you received the document from you can hit “Enable Editing” to the right of the notification under your Navigation area to be able to edit the document as normal.
Navigation Menu (Ribbon System)

The picture above shows the Ribbon System, or what is more commonly known as, the Navigation Menu. Each tab will bring up a different set of tools to modify and control your document. By pressing the Alt key, Word will show you the shortcut combos to quickly navigate the menu and features inside each menu. To use these shortcuts just tap Alt then the key shown, alt does not have to be held down.
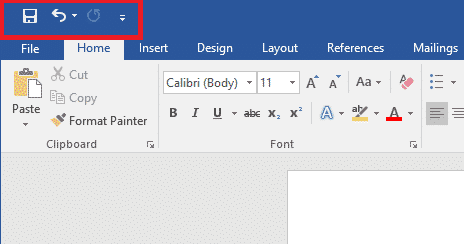
The quick access toolbar allows you to quickly access tools and functions that you might need or want commonly.
![]()
The bottom toolbar should look familiar to anyone who’s used previous versions of Word before. It will show you your page and word count, allow you to change how you view pages, and zoom in or out. Another useful feature is the book icon to the right of your word count. This icon will show the status of Word proof reading your document. If it has a check mark, you’re all set to go. Otherwise click on the icon to get a list of possible grammar, spelling, or formatting errors that Word has found.
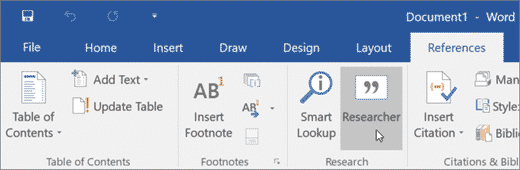
The “Researcher” feature can be found in the References tab of the navigation menu if you are logged into Word with an account that has access to Office 365. Word allows you to conduct research for what you’re working on without having to open a new internet browser and switch between the two programs. Once opened you can search for your topic and find information and sources. By clicking on the results Word can prepare an outline in the document for you or you can select text and have Word insert that text into your document as well as cite it for you.
Collaboration
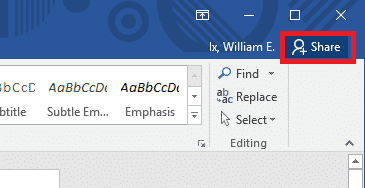
The “Collaboration” tool in Word 2016 allows you to work on documents with others in real time. To use this feature you must login to Word and save your document on either OneDrive or SharePoint. Other users you then invite will be able to edit or view, depending on the permissions you grant, the document in real-time with you. If you decide you want to later remove a user or change their permissions, you can do so by clicking on their icon to the left of the invite button.
Microsoft Outlook is an email client by Microsoft allowing you to login to your VTC email and manage it. You can read, send, archive, delete, mark as spam, create meetings, manage contacts, and more utilizing the client. It also has built in functionality with other Microsoft Office 2016 products. […]
Microsoft Outlook is an email client by Microsoft allowing you to login to your VTC email and manage it. You can read, send, archive, delete, mark as spam, create meetings, manage contacts, and more utilizing the client. It also has built in functionality with other Microsoft Office 2016 products.
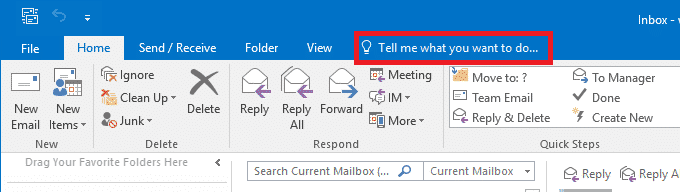
At the top of the navigation menu over to the right, you will notice a little light bulb icon with a search box next to it. This is Microsoft Office’s Tell Me feature, which allows you to search for features in Microsoft Office by typing in certain key words or phrases. For example if you type in “calendar” it will give you several options for viewing any calendars you have saved or shared to your account.
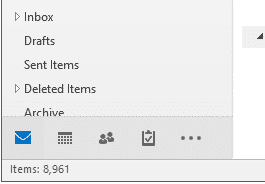
At the bottom left of your Outlook view you will see a menu. These icons allow you to switch between features of Outlook. The first of which is mail, for sending and receiving emails. Second there is the calendar view, for sharing, editing, and viewing your calendars. Third is your contacts, where you can see any saved contacts and edit their info. Lastly is your tasks, where you can set up a task list with different priorities and alerts.

The picture above shows the Ribbon System, or what is more commonly known as, the Navigation Menu. Each tab will bring up a different set of tools to modify and control Outlook. By pressing the Alt key, Outlook will show you the shortcut combos to quickly navigate the menu and features inside each menu. To use these shortcuts just tap Alt then the key shown, alt does not have to be held down.
Microsoft Publisher is an entry-level desktop publishing application from Microsoft, differing from Microsoft Word in that the emphasis is placed on page layout and design rather than text composition and proofing. Protected View When you download a document from your email or online you might notice you can’t make any changes to it. […]
Microsoft Publisher is an entry-level desktop publishing application from Microsoft, differing from Microsoft Word in that the emphasis is placed on page layout and design rather than text composition and proofing.
![]()
When you download a document from your email or online you might notice you can’t make any changes to it. This is because by default Publisher only allows you to view the document for your safety. If you trust where you received the document from you can hit “Enable Editing” to the right of the notification under your Navigation area to be able to edit the document as normal.
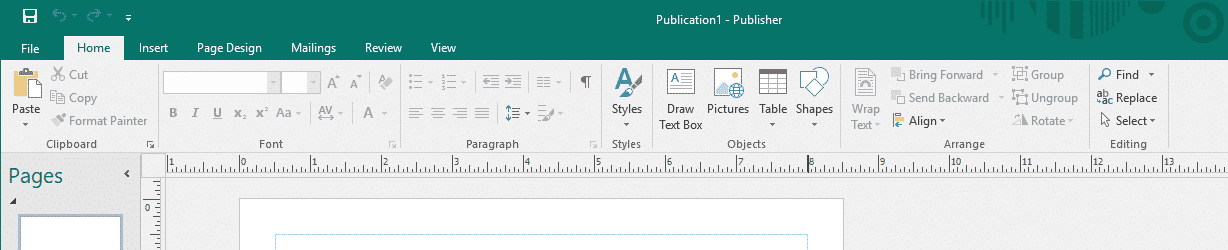
The picture above shows the Ribbon System, or what is more commonly known as, the Navigation Menu. Each tab will bring up a different set of tools to modify and control your document. By pressing the Alt key, Publisher will show you the shortcut combos to quickly navigate the menu and features inside each menu. To use these shortcuts just tap Alt then the key shown, alt does not have to be held down.
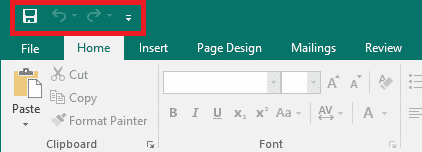
The quick access toolbar allows for you to quickly access tools and functions that you might need or want commonly.
The “Research” feature can be found in the Review tab of the navigation menu if you are logged into Publisher with an account that has access to Office 365. Publisher allows you to conduct research for what you’re working on without having to open a new internet browser and switch between the two programs. Once opened you can search for your topic and find information and sources. By clicking on the results Word can prepare an outline in the document for you or you can select text and have Publisher insert that text into your document as well as cite it for you.
We use cookies on this site to enhance your user experience. By clicking any link on this page you are giving your consent for us to set cookies.
More Info