Forgot Password

You will need your College ID number, Birth date, and access to your cellphone and/or email.
Manually enter portal.vsc.edu into your URL address bar

Click on “Forgot password” on the sign on form

 
On the following screen, enter ALL information with a  *  and tick the box allowing VTC to contact you via text […]

You will need your College ID number, Birth date, and access to your cellphone and/or email.

Manually enter portal.vsc.edu into your URL address bar

Click on “Forgot password” on the sign on form


On the following screen, enter ALL information with a  *  and tick the box allowing VTC to contact you via text or email.


From here, you will receive a PIN either via text or email.  Enter this number where prompted and you will be taken to a page to reset your password.

On the right of this page are the rules for making your new password.  You must satisfy all of these.

Once the page confirms your password has been reset, you should exit out of the browser completely.  Re-open the browser and manually type into the URL address bar portal.vsc.edu.

Log in with your new password.

If you continue to have problems, please contact IT by creating a work order at servicedesk.vsc.edu or by calling (802) 728-1721.

Forgot Username

You will need your College ID number to retrieve your Username.
Manually type portal.vsc.edu into your URL address bar

Click the link “Forgot my username”

Enter your College ID number, tick the box to accept a text and/or email from VTC.

After which, this message box will pop up saying that the username has […]

You will need your College ID number to retrieve your Username.

Manually type portal.vsc.edu into your URL address bar

Click the link “Forgot my username”

Enter your College ID number, tick the box to accept a text and/or email from VTC.


After which, this message box will pop up saying that the username has been sent either by text or email.


If you receive an error, such as “No email or phone number on file”, contact Key Student Services at (802) 728-1301.

Manage Recordings

Steps to manage your Zoom recordings
 
1. Go to the Zoom website: https://zoom.us/

 
2. Sign into the account you used to record the video

 
3. Click on the “Recordings” tab on the left side of the screen

 
4. Select the meeting you want to view/download, the meeting might be named generically, so be sure […]

Steps to manage your Zoom recordings


1. Go to the Zoom website: https://zoom.us/


2. Sign into the account you used to record the video


3. Click on the “Recordings” tab on the left side of the screen


4. Select the meeting you want to view/download, the meeting might be named generically, so be sure to check the “Start time” to make sure that it lines up with your desired meeting.


This is the recording management page, there are several things to note here.

  1. This is the main download button, it will download all of the available views, as well as the audio-only version of the recording that Zoom automatically provides.
  2. This button will copy a link to the video, you can distribute this link to anyone you want to view the recording.
  3. By clicking the thumbnail of the video, you can watch it as it currently is. You may want to trim unwanted excess from the beginning and end of the video, depending on how early or late you started the recording.
  4. This button will rename the recording. This is helpful for keeping track of your recordings, and for clarity when sending the video link to others.
  5. These controls let you download, link to, or delete a specific file. They only show up when you hover your cursor over the file.

Windows OneDrive Guide

Click the Start menu, and Search for OneDrive.

If you are on your personal computer, you may need to download it from the Store, which is an option listed in the Search results

By clicking on Store, it will open this page

The installer will prompt you for your school email address

You will […]

  • Click the Start menu, and Search for OneDrive.

  • If you are on your personal computer, you may need to download it from the Store, which is an option listed in the Search results
    • By clicking on Store, it will open this page

  • The installer will prompt you for your school email address
    • You will need to enter it in this format:
      • abc01010@vsc.edu where abc01010 is your school username


  • You will be redirected to the VSC login page. Please log in as you normally would for the Portal


  • You will be asked where to save the OneDrive folder.
    • Click ‘Next’

Note: If you are installing OneDrive on your own computer, you can change where the folder is stored.  However, on all VTC computers, please click ‘Next’ and do NOT change anything.


  • Your OneDrive folder will now appear in File Explorer.

Additional instruction on the use of OneDrive can be found on the Microsoft Support site including a list of OneDrive icons.

Joining a Meeting

How to join a Zoom meeting

Join by Meeting URL
The most common way to join a meeting is by the Meeting URL that was shared with you by the host. Simply click the Meeting URL and Zoom will automatically open or prompt to open if it is already installed. If you […]

How to join a Zoom meeting

Join by Meeting URL

The most common way to join a meeting is by the Meeting URL that was shared with you by the host. Simply click the Meeting URL and Zoom will automatically open or prompt to open if it is already installed. If you do not have Zoom installed, please visit our Downloading the App page. An example Meeting URL looks like: https://zoom.us/j/123456789

Join from within the Zoom app

To join a meeting from within the Zoom app, click on the Join button on the Home screen. Enter the Meeting ID or Personal Link Name then click the Join button.

Starting your Meeting

Here’s how to start your Zoom meeting

After creating your meeting, the easiest way to start it is from the Zoom app.
Open and sign in to Zoom and click on the Meetings tab at the bottom.
You will find all your scheduled meetings listed here. Hover over the meeting you want to […]

Here’s how to start your Zoom meeting

After creating your meeting, the easiest way to start it is from the Zoom app.

Open and sign in to Zoom and click on the Meetings tab at the bottom.

You will find all your scheduled meetings listed here. Hover over the meeting you want to start and click the Start button.


Customizing Meeting Settings

Zoom has many settings you can adjust that will apply to all your meetings. Some of the settings (such as Audio Type) will be your default settings going forward for creating new meetings.
To access these settings, login to your Zoom account at https://zoom.us/signin.
Click on the Meeting Settings link on the […]

Zoom has many settings you can adjust that will apply to all your meetings. Some of the settings (such as Audio Type) will be your default settings going forward for creating new meetings.

To access these settings, login to your Zoom account at https://zoom.us/signin.

Click on the Meeting Settings link on the left-side menu.

There are a lot of settings so we won’t cover them all here, we encourage you to look through the list to see what’s available yourself. We would like to highlight some settings that we find useful:

  • Always turn on or off the Host and/or Participants video when entering a meeting.
  • Change the Audio Type to Computer Audio by default.
  • Join before host will allow participants to jump into the meeting before the host arrives, if this is disabled the participants will instead be greeted with a waiting message saying that the host has not yet started the meeting.
  • Mute participants automatically is self explanatory and can be useful.
  • End-to-end encryption is available but will disable the file sharing feature.
  • There are various settings for controlling chat.
  • You can turn on Play sound when participants join or leave here.
  • File Transfer allows hosts and participants to send files through the in-meeting chat.
  • You can turn off the Feedback to Zoom setting so it stops asking for user feedback when exiting a meeting.
  • Polling can be turned on here. It allows the host to create polls for participants to fill out during a meeting.
  • You can turn on or off Annotation, Whiteboard or Remote Control features here as well.
  • Further down the list you can turn on or off Email Notification settings. By default it enables all of them but if you’d rather not get lots of emails about attendees waiting to join your meeting or when a meeting is cancelled, you can adjust them here.
  • At the top of the Meeting Settings page, you can also adjust some recording settings under the Recording tab.

Customizing your Profile

Customizing your Zoom profile
Log in to your Zoom account
https://zoom.us/signin
Once logged in, it will bring you to your profile page.  You can get back to this page by clicking on Profile on the left-side menu.
To change your profile picture
Click on the Change link underneath the default profile picture at the top […]

Customizing your Zoom profile

Log in to your Zoom account

https://zoom.us/signin

Once logged in, it will bring you to your profile page.  You can get back to this page by clicking on Profile on the left-side menu.

To change your profile picture

Click on the Change link underneath the default profile picture at the top next to your name.

You can view your Personal Meeting ID number here, you can also change it if you would like.

If you have a Zoom Pro account, you can create a Personal Link name here.

It is recommended that you start it with vtc. since we share our Zoom account with the entire VSC. An example would be: vtc.john.smith 

You can view your account type under User Type to see if you have a Pro or Free account.

Zoom allows you to change your sign-in email address but please do not do so.

All accounts under the VSC system must remain in the username@vsc.edu format. If you change this, it will get reset back to the default format.

You can change your password under the Sign-In Password section.

Zoom App Overview

Open the Zoom desktop app and sign in to your Zoom account.

When Zoom opens, you will be presented with the Home screen.
From here, you can host a new meeting, schedule a new meeting or join a meeting.

You can host a new meeting with the Start with video or Start without […]

Open the Zoom desktop app and sign in to your Zoom account.

When Zoom opens, you will be presented with the Home screen.

From here, you can host a new meeting, schedule a new meeting or join a meeting.

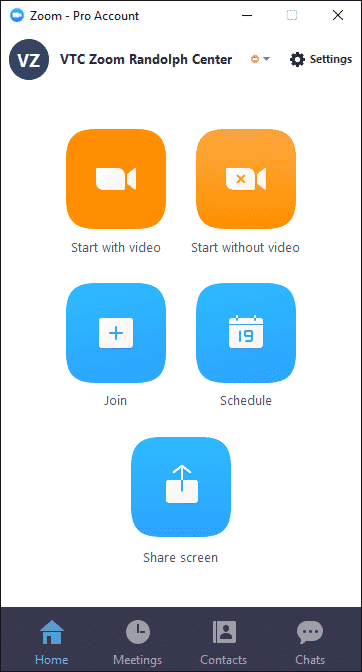
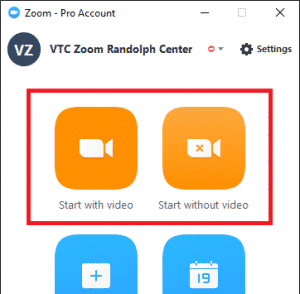
You can host a new meeting with the Start with video or Start without video buttons.

When starting a meeting with either of these buttons, by default you are assigned a random Meeting ID that you will need to share with the participants so they can join the meeting.

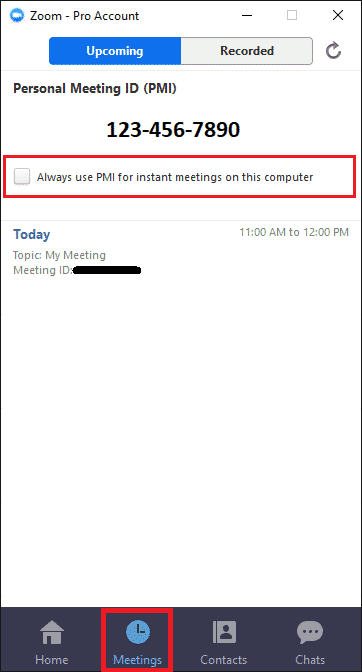
If you’d rather the Start with video button not use random Meeting ID’s every time and to always use your Personal Meeting ID associated with your Zoom account, click on the Meetings tab at the bottom of the Zoom app and then select Always use PMI for instant meetings on this computer.

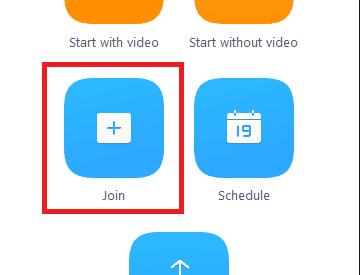
To join a meeting, click the Join button on the Home screen and then enter either the Meeting ID or the Personal Link Name.

You are given an option to enter your name and choose to disable your microphone and webcam upon joining. You can also join meetings by simply clicking on a Meeting URL that was shared with you. More information here: Joining a Meeting

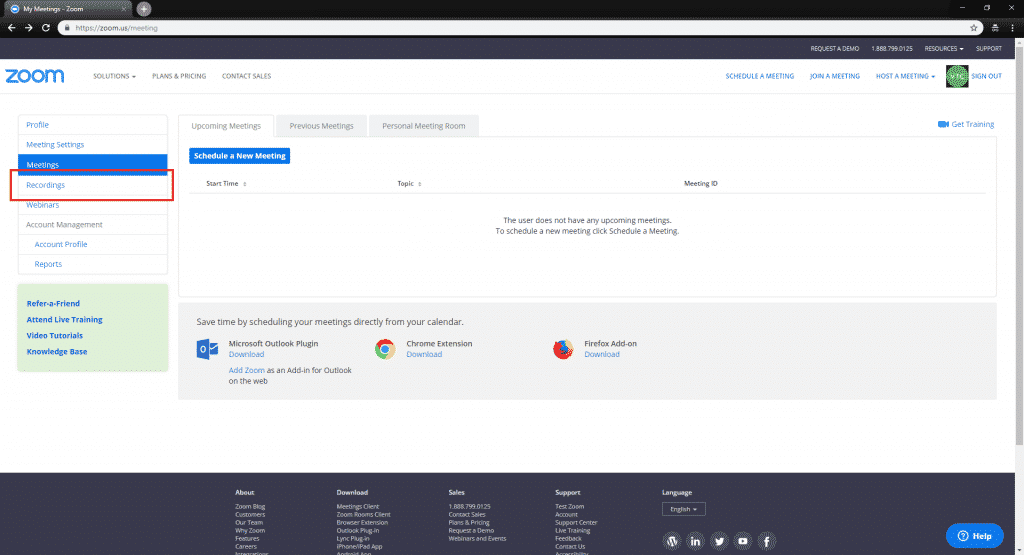
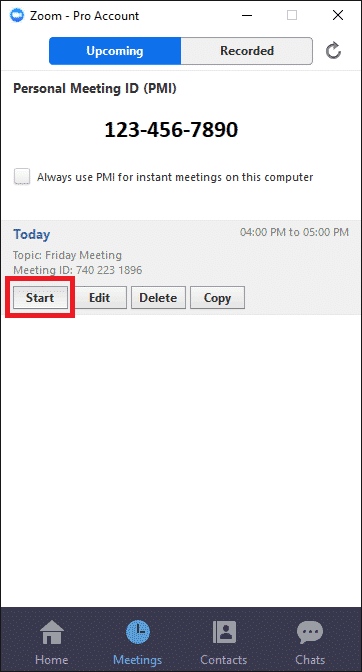
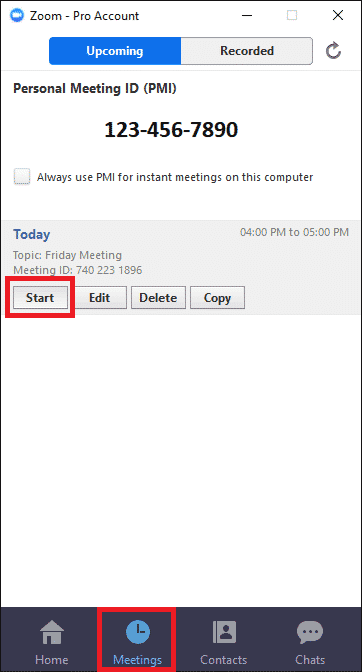
The Meetings tab at the bottom of the Zoom app will list your scheduled meetings.

To start a meeting, hover over it and then click the Start button. There is also an option at the top to see which meetings have been recorded.

The Contacts tab at the bottom of the Zoom app will show everyone that has a Zoom account throughout the VSC. You can select a contact and choose to either instant message or video call them.


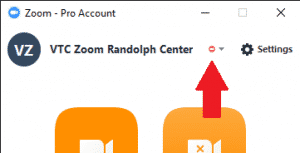
To logout of the Zoom app or to change your availability status, click the small dot next to the Settings button at the top.

In-Meeting Overview for Hosts

After starting your meeting, you will be presented with a toolbar at the bottom of the Zoom window.

The first two buttons on the toolbar allow you to mute/unmute your microphone and camera.

The Invite button will allow you to share the Meeting ID via Outlook or will copy the ID to the clipboard for you to share another way.

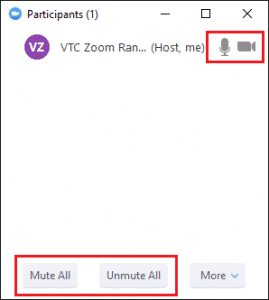
Manage Participants shows everyone connected into the meeting. From this list you can hover over a person and choose to mute/unmute them or you can mute/unmute all participants at the bottom.

The Share button allows you to share your screen(s) or an individual app that is currently open on your computer.

You can also turn on a shared whiteboard that everyone can write on.  There are additional sharing options under the arrow to the right of the Share button, one feature will allow multiple participants to share at the same time.

When you share your screen, the toolbar will move to the top of the screen. There will now be an Annotate button that will allow you to write on top of whatever is being shared. Some options will be listed under the More button. If you want to stop sharing, click the Stop Share button at the top.

The Chat button shows any active instant messages to you or the group.


Record allows you to record the meeting to the cloud or to your own computer.

More information about recording can be found here: Recording a Meeting.

Breakout Rooms allows you to split up the meeting into smaller groups.

You can allow Zoom to automatically divide up the participants into groups or you can manually choose to do it yourself. When you are ready, you can bring everyone back into one large group.

End Meeting will give you the option to end the meeting for everyone or for you to just leave the meeting yourself.


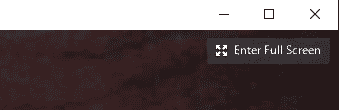
You can make the Zoom window go full screen by click the Enter Full Screen button in the top-right corner.

If you do not see this option, try moving your mouse to make it appear since this option and the main toolbar at the bottom automatically hide after a few seconds.
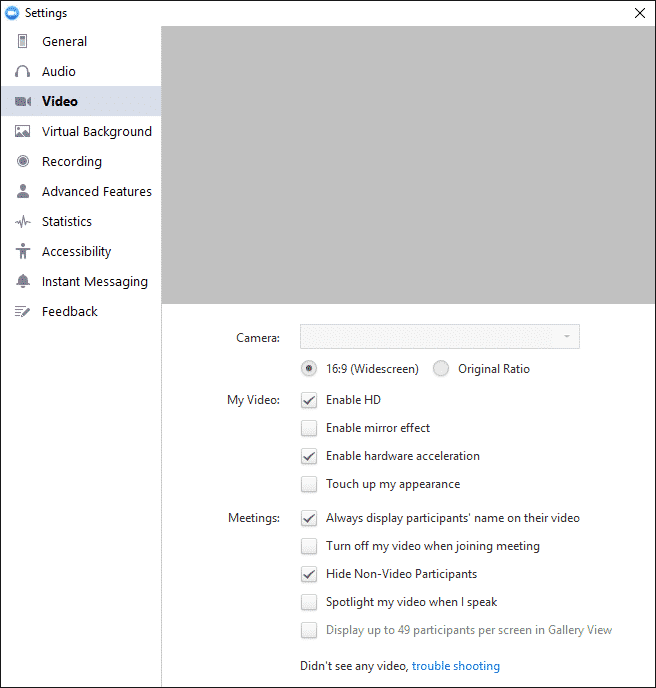
Settings

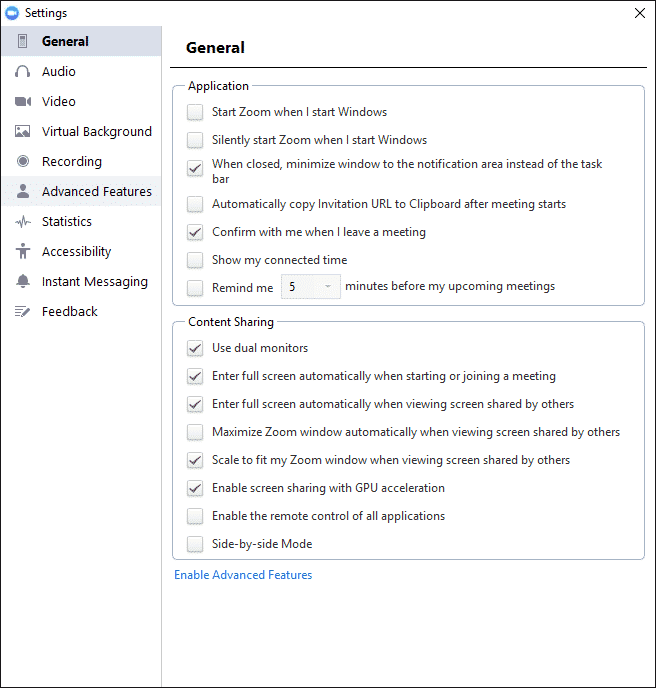
The Zoom app has lots of settings that you can adjust.

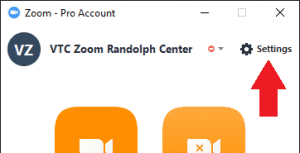
From the main Zoom app, click on the Settings button in the top-right corner.

On the General tab, you can adjust certain settings such as dual monitor support and entering full screen automatically when starting or joining a meeting.

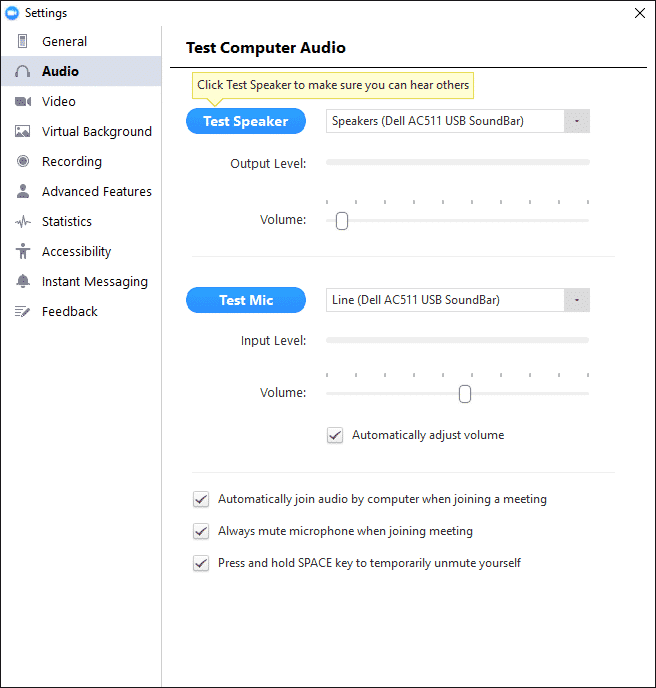
On the Audio tab, you can adjust the volume levels of both the speakers and microphone.

You can also make the app always use computer audio when joining a meeting or you can always mute your microphone when joining a meeting.

IMPORTANT: If you sign in to one of our telepresence rooms as yourself instead of the pre-configured teacher account that is stated in the guide, you must turn off Automatically adjust volume underneath the microphone settings. Failing to do this will alter our AV equipment audio levels and you will need to call support for assistance.

On the Video tab, you can turn on HD video support for slightly better quality.

You can also turn off the mirror effect if you do not want Zoom reversing your video when hosting a meeting.