
Microsoft Word is a word processing program which allows you to create documents with various formatting and customization options. Add videos, graphs, pictures, watermarks, styling, and more. Word Documents can be saved in multiple formats including PDFs.
Tell Me
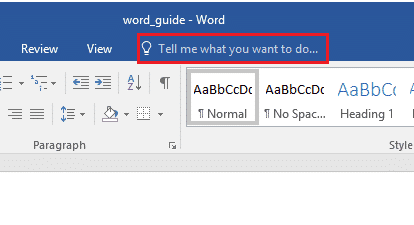
At the top of the navigation menu over to the right, you will notice a little lightbulb icon with a search box next to it. This is Microsoft Word’s Tell Me feature, which allows you to search for features in Microsoft Word by typing in certain key words or phrases. For example, if you wanted to know how to insert a picture into your document, you could search “picture” and Tell Me will come up with a small list of features, including the insert picture action.
Protected View
![]()
When you download a document from your email or online you might notice you can’t make any changes to it. This is because by default Word only allows you to view the document for your safety. If you trust where you received the document from you can hit “Enable Editing” to the right of the notification under your Navigation area to be able to edit the document as normal.
Navigation Menu (Ribbon System)

The picture above shows the Ribbon System, or what is more commonly known as, the Navigation Menu. Each tab will bring up a different set of tools to modify and control your document. By pressing the Alt key, Word will show you the shortcut combos to quickly navigate the menu and features inside each menu. To use these shortcuts just tap Alt then the key shown, alt does not have to be held down.
- The “File” tab will bring up a new window where you can save, open, print, and share a document. This is also where you can create a new document.
- The “Home” tab is your standard text tools where you can change font style, size, line spacing, color, indent, heading style, and more.
- The “Insert” tab is where you’ll insert or embed things into your document such as tables, shapes, videos, comments, symbols, and equation notations. You can also insert a cover page from here.
- The “Design” tab allows you to select from a number of pre-made document themes as well as customize it. This is also where you would add watermarking.
- The “Layout” tab is where you can change your document margins, orientations, add line numbers, and modify other general document layout settings.
- The “References” tab is where you can add your various forms of references and citations. You can add footnotes, endnotes, captions, and even a table of contents. Make sure to change the style under “Citations and Bibliography” to meet your requirements.
- The “Mailings” tab allows for you to create personalized letters quickly when sending to a large batch of users. You can setup mailing lists and specify different customized lines for different mailing lists while keeping other content the same.
- The “Review” tab allows you to do things like check spelling & grammar or utilize tools like thesaurus, word count, and translate. You can also manage comments here and track changes made to the document.
- The “View” tab allows you to change how you view things in Word 2016. You can change your zoom, how many pages you see at once, switch between different instances of Word, and also enable grid lines or the ruler feature. This is also where you can record and view any macros you have created.
Quick Access Toolbar
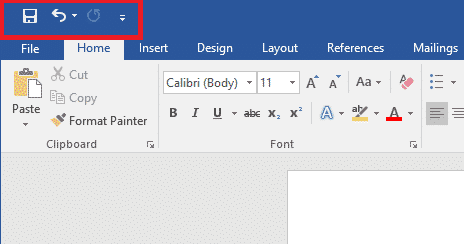
The quick access toolbar allows you to quickly access tools and functions that you might need or want commonly.
- The “Save” button allows you to quickly save without having to go through the file tab. If you have not yet saved your document this will act as “Save As”, asking where you would like to save it and what you would like to name it. Shortcut: Ctrl + S on Windows and + S on Mac.
- The “Undo” button allows you to undo the last change you made to your document. This will allow you to undo any changes you’ve made this session. The arrow down next to it will allow you to select a specific change and it will undo everything from that point on. Alternatively you can hold down the shortcut to undo until release. Shortcut: Ctrl + Z on Windows and + Z on Mac.
- The “Repeat” button allows you to do a couple different things. It is commonly used to redo an action you might have accidentally undone or it can also repeat the last thing you did such as inserting a table. Holding down the shortcut will use this function multiple times. Shortcut: Ctrl + Y on Windows and + Y on Mac.
- The last button on the Quick Access Toolbar is a dropdown menu which features common windows functions such as save and spell check. This can be customized to include features you commonly use so you don’t have to memorize shortcuts or switch tabs every time you wish to do something.
Bottom Toolbar
![]()
The bottom toolbar should look familiar to anyone who’s used previous versions of Word before. It will show you your page and word count, allow you to change how you view pages, and zoom in or out. Another useful feature is the book icon to the right of your word count. This icon will show the status of Word proof reading your document. If it has a check mark, you’re all set to go. Otherwise click on the icon to get a list of possible grammar, spelling, or formatting errors that Word has found.
Research
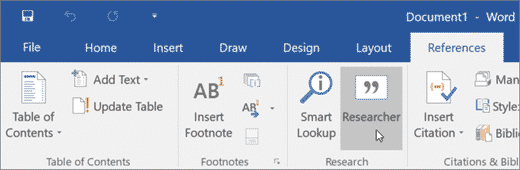
The “Researcher” feature can be found in the References tab of the navigation menu if you are logged into Word with an account that has access to Office 365. Word allows you to conduct research for what you’re working on without having to open a new internet browser and switch between the two programs. Once opened you can search for your topic and find information and sources. By clicking on the results Word can prepare an outline in the document for you or you can select text and have Word insert that text into your document as well as cite it for you.
Collaboration
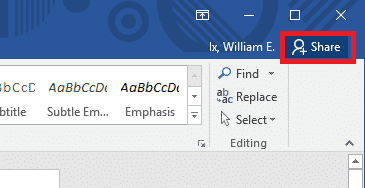
The “Collaboration” tool in Word 2016 allows you to work on documents with others in real time. To use this feature you must login to Word and save your document on either OneDrive or SharePoint. Other users you then invite will be able to edit or view, depending on the permissions you grant, the document in real-time with you. If you decide you want to later remove a user or change their permissions, you can do so by clicking on their icon to the left of the invite button.
- The “Invite” button allows you to invite another user by the email that they use to login to Microsoft Word. You can select what permissions to give them so that if you only want them to be able to view the document and not make any changes, you can do so.
- The “History” button allows you to see a history of changes, who made them, and at what time. This will also allow you to revert back to old version of the document if necessary.
- The “Chat” button opens the chat window. You can use standard text chat to type to other users of the document by connecting to a Skype For Business account if that account is different than the one you used to login to Word. If you would like to message only a specific person you can click on their icon.